


[Tutorial] Creating collision mesh
In this tutorial I will show you, how to add good collision mesh to your models. I found this way of doing it accidentaly, but it's working")
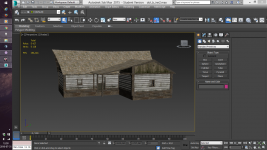
Ok, at the first you have to create your model. For example, here is my model of house:
View attachment 63381
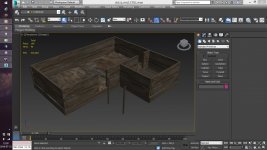
When your model is finished, create new model, that are based on the main model. That model will be collision mesh. Create this using simple boxes. Here is collision mesh of my model:
View attachment 63391
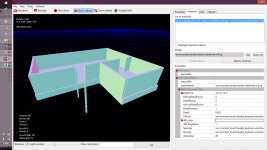
If your models are completed, then you have to export them to .re file. But, you have to create two separated files. First only with base model and second only with your collision mesh. Every model have to be exported as a LOD0! (Base model can have LOD1 and LOD2). When you have .re file of collishion mesh, you have to import it into RedKIT. Open your mesh file in RedKIT after importing, and then choose Collision->Create exact collision. Of course, you have to turn on showing collision option. When you do this, you should have something like this:
View attachment 63401
Note: If you created collision, and turned on showing collisions, but it still doesn't looks like on the screenshot above, you have to choose option Tools->Swap collision triangles.
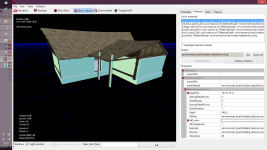
After that, you can finally import .re file of your base model. Remember, name of importing base model has to be the same as imported collision mesh.
You should get something like this:
View attachment 63411
In this tutorial I will show you, how to add good collision mesh to your models. I found this way of doing it accidentaly, but it's working
Ok, at the first you have to create your model. For example, here is my model of house:
View attachment 63381
When your model is finished, create new model, that are based on the main model. That model will be collision mesh. Create this using simple boxes. Here is collision mesh of my model:
View attachment 63391
If your models are completed, then you have to export them to .re file. But, you have to create two separated files. First only with base model and second only with your collision mesh. Every model have to be exported as a LOD0! (Base model can have LOD1 and LOD2). When you have .re file of collishion mesh, you have to import it into RedKIT. Open your mesh file in RedKIT after importing, and then choose Collision->Create exact collision. Of course, you have to turn on showing collision option. When you do this, you should have something like this:
View attachment 63401
Note: If you created collision, and turned on showing collisions, but it still doesn't looks like on the screenshot above, you have to choose option Tools->Swap collision triangles.
After that, you can finally import .re file of your base model. Remember, name of importing base model has to be the same as imported collision mesh.
You should get something like this:
View attachment 63411
Attachments
-
 Zrzut ekranu 2016-07-31 12.50.11.png363.1 KB · Views: 129
 -
 Zrzut ekranu 2016-07-31 12.50.29.jpg108.2 KB · Views: 144
 -
 Zrzut ekranu 2016-07-31 13.04.03.png89 KB · Views: 140
 -
 Zrzut ekranu 2016-07-31 13.10.36.png245.4 KB · Views: 146