Hello,
Sorry for the late response, but I've been inactive for some time so I couldn't give any answers.
@GaroK0
RedKit only comes with the english speech files. It could be possible to get the other speech files by extraciting them from the base game.Sadly there is no other way I know. Probably you need gibbed red tools to unpack the base game and then something to further edit and open the original speech files.
@PvZPlaying
Which file exactly did you change? Could you name the folder and file name. I could send you a unchanged file to restore the original. In general before you mess around make backup of the originals or don't mess with them but mess with a copy of the original entities.
@IliyaSherlock
Sadly there aren't any tutorials for the material editor. My personal knowledge is limited to analyzing the materials available. If you worked with materials before in Unity you might have a better understanding of materials than I have. To make it simple the small preview window does not work. You have all the possible starting points for materials under rigth click ( in the grey space of the editor)-> Misc. Under Lighting is an old version not used anymore. Under Math you have the nodes that allow too add mathematical "stuff". Parameters are used for number values and to add texture nodes. Samplers describe how your textures can be used. There are different samplers the most baisc is the texture sampler. Special no clue sorry. And Stream mostly is about values to change the postion of the texture I guess reagrding to some other values like eg. World Position. Some of the nodes are kind of self explinatory when you read the name. But it's a mess and you need proper knowledge how materials and nodes work to understand the material editor. Side note, it also depends how you name the nodes in the material editor. Unchanged nodes won't be editable outside of the material editor. Blue nodes ( nodes that are named) are editiable outside of the the material editor and orange Nodes will stay the same eg. for the detail rotation in the detailmat material. On the right side of the material editor you have information about the material and it's parameters etc. , if no nodes is selected.
The best adivce I can give you would ask the FOTWW guys for advice becasue they worked intensively with the games materials and tried to add their own pbr like material.
@Reee_
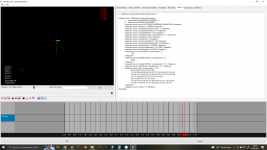
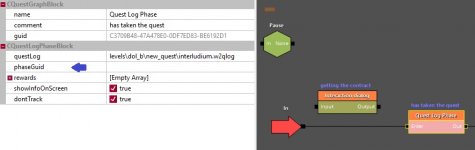
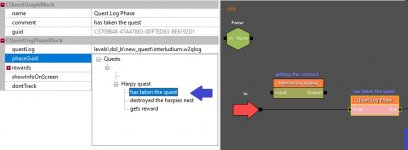
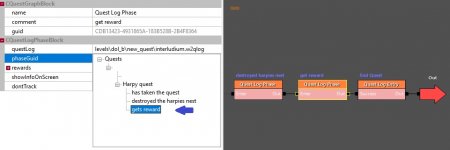
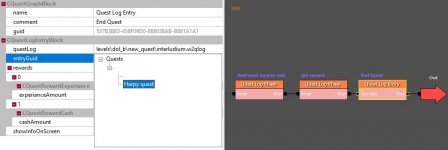
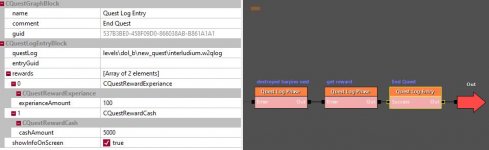
Hey here are some screenshots which try to describe the things ecplained under point 3.4 of the tutorial. The quest structure might be alittle bit different and the dialogue is not connected but the structure works and is based on the kill the nekker hives quest from The Witcher 2. I general a good advice to understand how something is done in The Witcher 2 is to remember a quest and than serach for the developers quest and try to undertand and replicate it. If you have further question feel free to ask.
At anybody reading or having questions: Due to low activity in this forum answers might take some time or might be limited by my knowledge so come back from time to time if you don't get a fast answer.
Sorry for the late response, but I've been inactive for some time so I couldn't give any answers.
@GaroK0
RedKit only comes with the english speech files. It could be possible to get the other speech files by extraciting them from the base game.Sadly there is no other way I know. Probably you need gibbed red tools to unpack the base game and then something to further edit and open the original speech files.
@PvZPlaying
Which file exactly did you change? Could you name the folder and file name. I could send you a unchanged file to restore the original. In general before you mess around make backup of the originals or don't mess with them but mess with a copy of the original entities.
@IliyaSherlock
Sadly there aren't any tutorials for the material editor. My personal knowledge is limited to analyzing the materials available. If you worked with materials before in Unity you might have a better understanding of materials than I have. To make it simple the small preview window does not work. You have all the possible starting points for materials under rigth click ( in the grey space of the editor)-> Misc. Under Lighting is an old version not used anymore. Under Math you have the nodes that allow too add mathematical "stuff". Parameters are used for number values and to add texture nodes. Samplers describe how your textures can be used. There are different samplers the most baisc is the texture sampler. Special no clue sorry. And Stream mostly is about values to change the postion of the texture I guess reagrding to some other values like eg. World Position. Some of the nodes are kind of self explinatory when you read the name. But it's a mess and you need proper knowledge how materials and nodes work to understand the material editor. Side note, it also depends how you name the nodes in the material editor. Unchanged nodes won't be editable outside of the material editor. Blue nodes ( nodes that are named) are editiable outside of the the material editor and orange Nodes will stay the same eg. for the detail rotation in the detailmat material. On the right side of the material editor you have information about the material and it's parameters etc. , if no nodes is selected.
The best adivce I can give you would ask the FOTWW guys for advice becasue they worked intensively with the games materials and tried to add their own pbr like material.
@Reee_
Hey here are some screenshots which try to describe the things ecplained under point 3.4 of the tutorial. The quest structure might be alittle bit different and the dialogue is not connected but the structure works and is based on the kill the nekker hives quest from The Witcher 2. I general a good advice to understand how something is done in The Witcher 2 is to remember a quest and than serach for the developers quest and try to undertand and replicate it. If you have further question feel free to ask.
At anybody reading or having questions: Due to low activity in this forum answers might take some time or might be limited by my knowledge so come back from time to time if you don't get a fast answer.
Attachments
-
 harpy quest layout.JPG42.6 KB · Views: 69
 -
 connecting the quest phases 1.jpg48.5 KB · Views: 91
 -
 connecting the quest phases 2.jpg56.5 KB · Views: 75
 -
 connecting the quest phases 3.jpg55.7 KB · Views: 66
 -
 connecting the quest phases 4.jpg42.2 KB · Views: 66
 -
 connecting the quest phases 5.jpg45.4 KB · Views: 77
Last edited:
")