In the coming months, the first people will get to experience The Witcher in Concert! We can’t wait to show you what we’ve been working on, so here’s a glimpse!
Fresh, dedicated orchestration
Our goal is to create a truly unique event for our audiences, one that allows them to experience music from The Witcher 3: Wild Hunt, one they’ve come to know and adore, through a lovingly crafted, immersive music experience. It’s not as simple as rounding up musicians and going on a stage — everything has to sound
perfect.
To achieve this, Marcin Przybyłowicz, our Expert Music Composer, is working with, among others, Nikola Kołodziejczyk, composer, arranger, conductor, and pianist, two-time winner of Fryderyk Award for his large ensemble works, and Paulina Porszke, member of the Paulina Porszke Ensemble as well as pianist, composer, arranger, and vocalist well-regarded in the music world. All to adapt the soundtrack and arrange it specifically with the instruments that will appear on stage in mind.
On the stage you will see and
hear the band Percival, co-composers of the game’s original soundtrack, alongside supporting musicians who will work together with them to elevate the experience through the sounds of cellos, trombones, violins, French horns, clarinets, and others.
Tracks from the soundtrack have been arranged in an order that will retell the story of Geralt’s quest to find Ciri, and with an entourage of 14 minstrels, he will surely succeed!
Breathtaking visuals
Making sure the music hits all the right points is our utmost priority, but our team at CD PROJEKT RED is also working on creating the ideal visual layer to make the experience as entrancing and immersive as possible. Every single frame of the video scene has been prepared to perfectly fit the music and the story it tells.
What’s next?
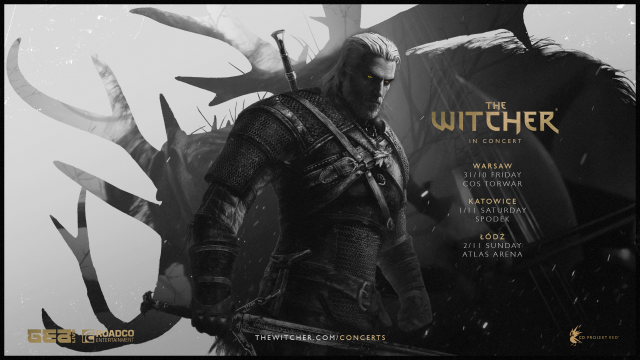
With multiple concerts selling out, we can see that you want MORE — and we’re working on it, promise! First and foremost, we’ve been working hard to bring more The Witcher in Concert dates to Poland and were thrilled to see your response, with our Poznań stop selling out in a matter of hours, if not minutes!
So, we’re overjoyed to announce that we’re adding the following dates to The Witcher in Concert’s European leg:
- Warsaw - October 31st
- Katowice - November 1st
- Łódź - November 2nd
Regular ticket sales will start on
Friday, April 25th at 12:00 PM CEST. Just like before, if you’ve subscribed to our newsletter at
https://www.thewitcher.com/concert, you will receive a pre-sale code to get a head start as early as tomorrow, that is
Wednesday, April 23rd at 12:00 PM CEST!
Don’t forget that there are still tickets available for some of the concerts we already announced. Definitely make sure to check out the concert planned for August 20th at gamescom — as it’s the official start of The Witcher in Concert tour, much like the special invite-only event at Teatr Wielki - Polish National Opera, we’re pulling out all the stops for this one to make it worthy of being the series’ opener!
Is this all we have for you? Of course not! As said before, we’re working on adding even more stops for The Witcher in Concert world tour — stay tuned for more info coming soon!


 Standard: Xbox Wireless Controller – The Witcher 3 10th Anniversary Edition

 news.xbox.com
 では…
では…